
Project 2 : Exterior and Interior Rendering
Students are required to render the project 1 model by using 3ds Max and have a post production by photoshop
Work in Progress (WIPs)
Step 1 : Adding furniture on the 1st floor and 2nd floor
![Autodesk Revit 2023 - [Revit project 1 - Floor Plan_ Level 1] 12_1_2022 12_38_02 PM.png](https://static.wixstatic.com/media/0c6521_ca1533cea9d54a779d12977a864fc8e5~mv2.png/v1/fill/w_384,h_206,al_c,q_85,usm_0.66_1.00_0.01,enc_avif,quality_auto/Autodesk%20Revit%202023%20-%20%5BRevit%20project%201%20-%20Floor%20Plan_%20Level%201%5D%2012_1_2022%2012_38_02%20PM.png)
![Autodesk Revit 2023 - [Revit project 1 - Reflected Ceiling Plan_ Level 2] 12_1_2022 12_51_](https://static.wixstatic.com/media/0c6521_1edc70fe706b494094222170b347a209~mv2.png/v1/fill/w_384,h_206,al_c,q_85,usm_0.66_1.00_0.01,enc_avif,quality_auto/Autodesk%20Revit%202023%20-%20%5BRevit%20project%201%20-%20Reflected%20Ceiling%20Plan_%20Level%202%5D%2012_1_2022%2012_51_.png)
![Autodesk Revit 2023 - [Revit project 1 - Floor Plan_ Level 1] 12_1_2022 12_38_18 PM.png](https://static.wixstatic.com/media/0c6521_9d4c4c3f19d941bdaae755e9181bdc01~mv2.png/v1/fill/w_384,h_206,al_c,q_85,usm_0.66_1.00_0.01,enc_avif,quality_auto/Autodesk%20Revit%202023%20-%20%5BRevit%20project%201%20-%20Floor%20Plan_%20Level%201%5D%2012_1_2022%2012_38_18%20PM.png)

Step 2 : Adding ceiling and lighting on the ceiling plan

![Autodesk Revit 2023 - [Revit project 1 - Floor Plan_ Level 2] 12_1_2022 12_45_58 PM.png](https://static.wixstatic.com/media/0c6521_f348056c7ce34d5fa03745c19813ccbc~mv2.png/v1/fill/w_438,h_235,al_c,q_85,usm_0.66_1.00_0.01,enc_avif,quality_auto/Autodesk%20Revit%202023%20-%20%5BRevit%20project%201%20-%20Floor%20Plan_%20Level%202%5D%2012_1_2022%2012_45_58%20PM.png)
Step 4: Try to render on Revit.
Step 3: Adjust the angle made by camera.
![Autodesk Revit 2023 - [Revit project 1 - Reflected Ceiling Plan_ Level 1] 12_1_2022 1_13_4](https://static.wixstatic.com/media/0c6521_13a0a630e8084cf2b6e3b0b36514a910~mv2.png/v1/fill/w_438,h_235,al_c,q_85,usm_0.66_1.00_0.01,enc_avif,quality_auto/Autodesk%20Revit%202023%20-%20%5BRevit%20project%201%20-%20Reflected%20Ceiling%20Plan_%20Level%201%5D%2012_1_2022%201_13_4.png)

Step 5: Export the project file.
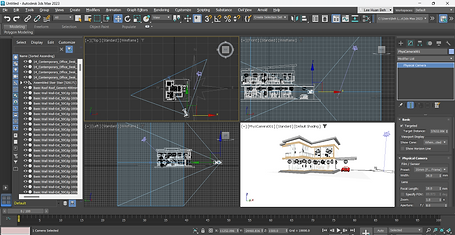
Step 6: Import the file into 3ds max.
![Autodesk Revit 2023 - [Revit project 1 - Reflected Ceiling Plan_ Level 1] 12_1_2022 1_05_4](https://static.wixstatic.com/media/0c6521_047fdf20c9b74807bfb87457428b14c2~mv2.png/v1/fill/w_183,h_225,al_c,q_85,usm_0.66_1.00_0.01,enc_avif,quality_auto/Autodesk%20Revit%202023%20-%20%5BRevit%20project%201%20-%20Reflected%20Ceiling%20Plan_%20Level%201%5D%2012_1_2022%201_05_4.png)

Step 7: Adjust the direction and the placing of sun
Step 8: Placing the camera at the most favourable angle of the exterior of model.

Step 9: Adjust the lighting of the rendering and quality of rendering for a render preview.


Step 10: Look for a draft preview with lower quality.

Step 11: Complete the high quality rendering.

Step 12: Had a 2nd physical camera and switch the 3d view into 2nd physical camera.

Step 12: After a favourable angle was found, adjust the lighting of rendering as previous.


Step 13: Had a draft preview on the rendering.

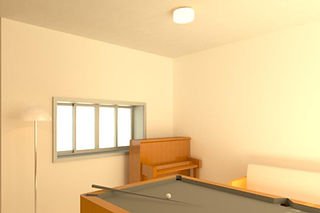
Step 14: A final outcome.

Step 15 : Import both interior and exterior rendering into photoshop and had a post production for the rendering.


